Table of Contents
Reporting Owners
Before creating a new Section 16 form, you must add at least one Reporting Owner to your account.
Select Reporting Owners from the navigation menu at the top of the RDG16 page.
Adding a Reporting Owner
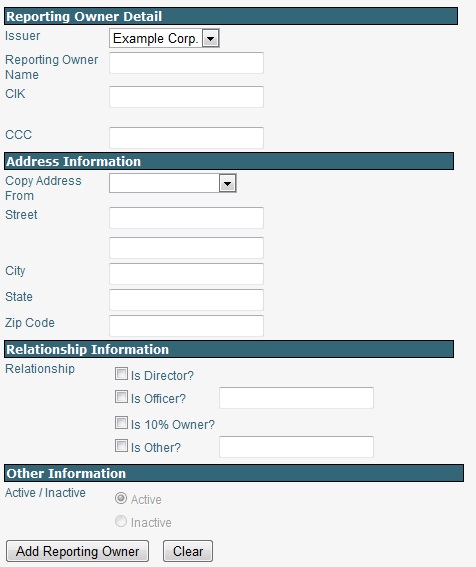
To add a new reporting owner, complete the form and select the Add Reporting Owner button at the bottom.
Reporting Owner Name – note that the name you enter here will not be the name on the form when it is filed with the SEC. The SEC will use the CIK of the reporting owner and pull the name as it appears in their database.
CIK - The CIK is a unique, public number that is assigned to each entity that submits filings to the SEC. It must be ten digits.
CCC – The CCC (CIK Confirmation Code) is a code used in combination with the CIK to submit a filing via EDGAR. The CCC is eight characters having at least one number (0-9) and at least one special character (@, #, $, *). The CCC is case-sensitive.
Copy Address From – when adding multiple reporting owners each with the same address, you may copy the address from an existing reporting owner to save time.
Relationship – at least one relationship must be entered. There may be multiple relationships for a reporting owner. The text fields describing Officer and Other are each limited to 30 characters.
Editing a Reporting Owner Record
To edit a reporting owner record, select the Edit link to the right of the reporting owner. The form will populate with the current information. Make your changes, then select the Save Changes button.
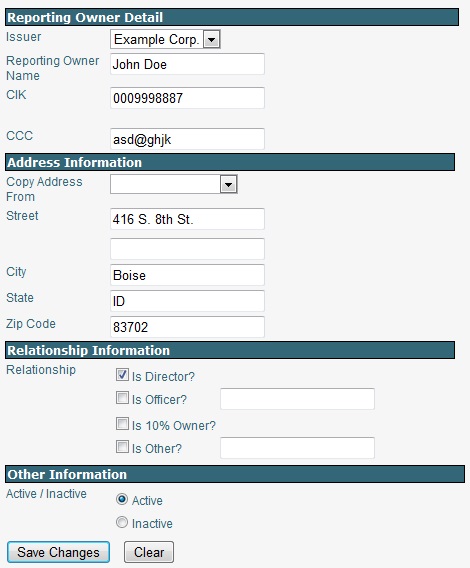
Removing a Reporting Owner – to remove a reporting owner, edit the record and make the reporting owner Inactive, then select the Save Changes button. If at a later date you would like to make the reporting owner active again, select the “Include Inactive Reporting Owners” box at the top of the page to view all reporting owners, active and inactive. Edit the inactive reporting owner’s record, change from Inactive to Active, and Save Changes.
Account Management
Select Account Management from the navigation menu at the top of the RDG16 page.
Issuer Information
An RDG16 account may be used for multiple Issuers. When the account is set up initially, one Issuer is added automatically. To add an additional Issuer, fill in the form and select the Add Issuer button.
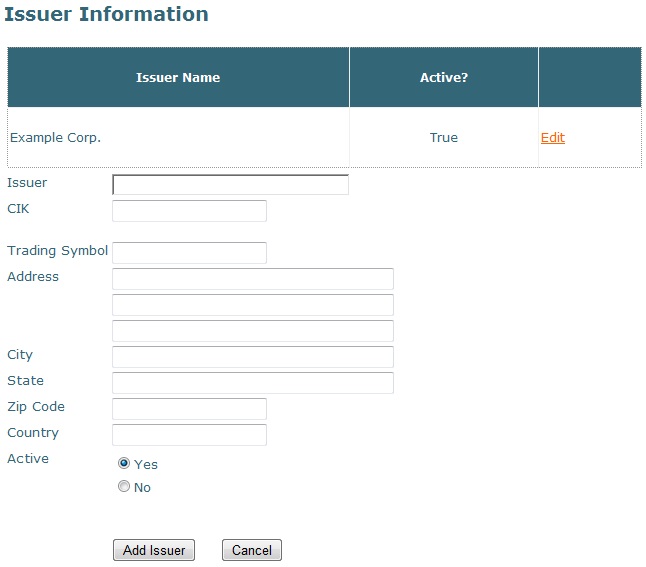
Issuer, CIK and Trading/Ticker Symbol are required. The other fields are optional.
To edit an Issuer record, select the Edit link to the right of the Issuer name, make changes, then select the Save Changes button.
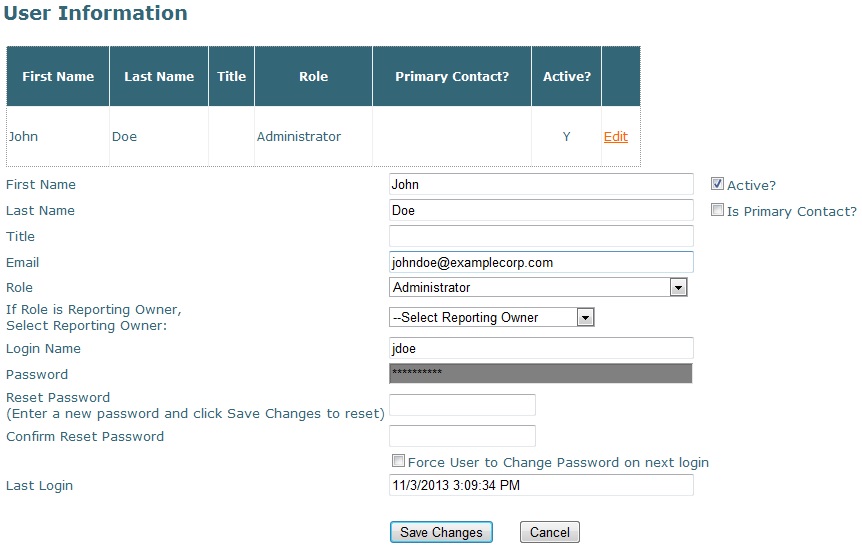
User Login Information
An RDG16 account may be used by more than one user. When the account is initially created, a user will be added automatically. To add additional users, fill in the form and select the Add User button.
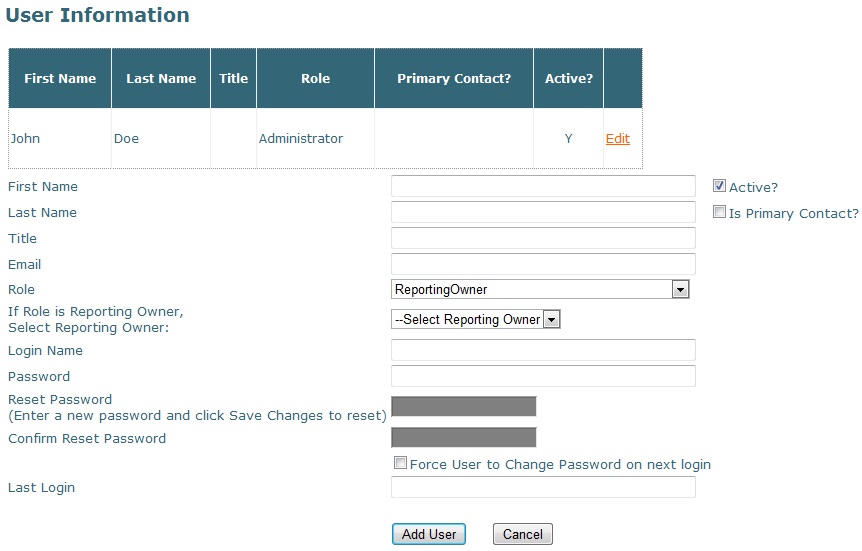
If the new user is not also a Reporting Owner, select Administrator as the Role.
To edit a user record in order to reset a password, make inactive, etc., select the Edit link to the right of the User name. The form will populate. Make changes, then select the Save Changes button.
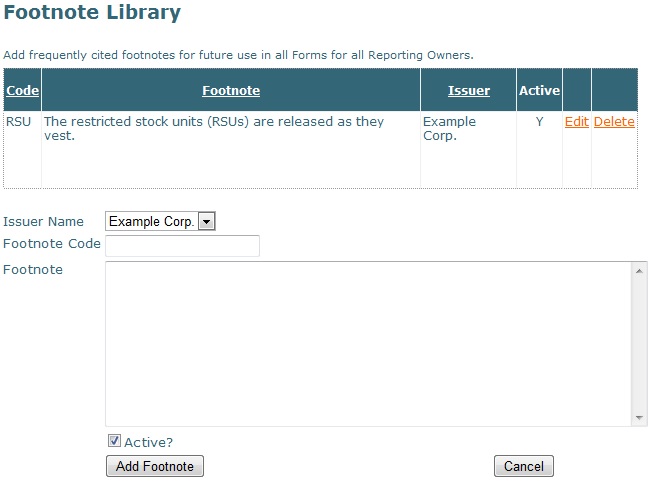
Footnote Library
Frequently cited footnotes may be saved to the Footnote Library for use in future forms. To add a footnote to the Footnote Library, select the Issuer, enter a Footnote Code (a short name for the footnote), and enter the footnote text.

To finish adding the footnote, select the Add Footnote button.
Saved footnotes will be listed in the table above and may be edited or deleted by selecting the links to the right of the entry.
When creating a new Section 16 form, you may select a saved footnote from the Footnote Library. You may also add a new footnote to the Footnote Library without having to navigate to the Account Management pages. For more information on using footnotes in a Section 16 form, see Footnotes in the Prepare a Filing section.
Attachment Library
Attachments (i.e. Exhibits) may be saved in the Attachment Library for use with future forms. To save an attachment for future use, select the Issuer, browse to the file on your computer or server, then select the Save Supporting Document button. Descriptive file names will be helpful later when selecting a document from your Attachment Library. For example, the file uploaded in the example below is a Power of Attorney for a reporting owner with the last name Gardner.

When creating a new Section 16 form, you may select a saved attachment from the Attachment Library. You may also add a new attachment to the Attachment Library without having to navigate to the Account Management pages. For more information on attachments in a Section 16 form, see Attachments Tab in the Preparing a Filing section.
Auto-Calculate Manager
RDG16 can auto-calculate post-transaction amounts for non-derivative securities in Table I of a Form 4. In order to use the auto-calculation feature, a record for each security title must be entered, with the current beneficially owned share amount. Auto-calculate is an optional feature and if used, should be used consistently so that share amounts are kept current. (Note that currently auto-calculate only works with Table I of a Form 4.)
To add a new security title/current share amount record, fill in the form and select the Add button.
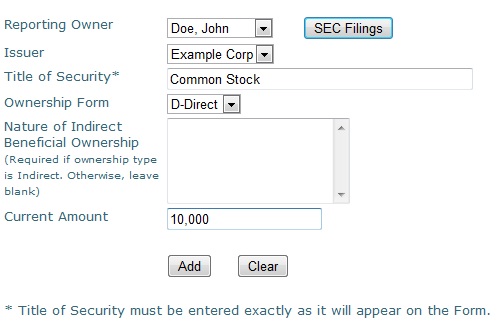
Title of Security must be entered exactly as it will appear on the Form 4.
If ownership is Indirect, the Nature of Indirect Beneficial Ownership must be entered exactly as it will appear on the Form 4.
Once the Reporting Owner has been selected, the SEC Filings button will open a browser page at sec.gov showing all past Section 16 filings for the reporting owner. This can be helpful in verifying current beneficially owned share amounts.
When the Add button is selected, the record will appear in a table above the form.
![]()
You may add an unlimited number of unique records.

To edit or delete a record, select the links to the right of the record.
To learn how the Auto-Calculate feature works when preparing a filing, see Form 4/Table I in the Prepare a Filing section.
Prepare a Filing
To create a new Section 16 form, select Prepare a Filing from the navigation menu at the top of the RDG16 page.
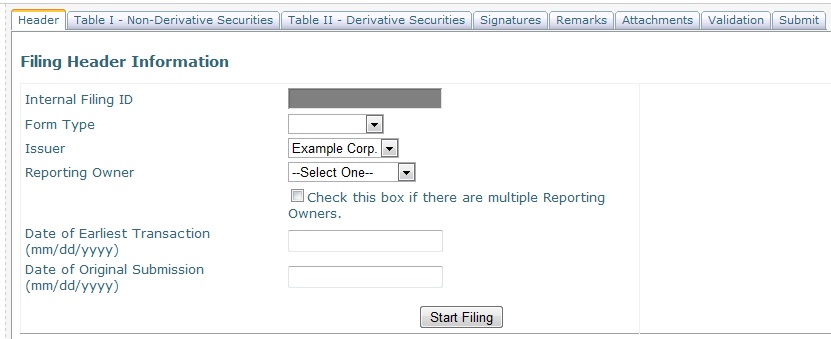
The form preparation screen will appear. There are eight tabs from left to right.
![]()
To complete the form, move from one tab to the next.
Header Tab
The Header tab is the starting point for a new form. This is where the Form Type, Issuer, Reporting Owner and dates are entered.
Internal Filing ID – this is an identifying number assigned by the program. It cannot be edited or changed, and has no bearing on the filing.
Form Type – Form 3, 4 or 5, or if an amendment, Form 3/A, 4/A or 5/A
Issuer – a drop down menu of all Issuers set up for this account
Reporting Owner – a drop down menu of all Reporting Owners set up for the Issuer
Multiple Reporting Owners - if the form is being filed by multiple reporting owners, check the box labeled “Check this box if there are multiple Reporting Owners”. Once the Header information is complete and you select the Start Filing button, you will be directed to a screen where you can add additional reporting owners. Note that the SEC’s system will only allow ten reporting owners per joint filing. In order to file jointly for more than ten reporting owners, file as many additional forms, with up to ten reporting owners on each, as needed and place a footnote on each of the forms that cross-references the other forms, contains a list of the reporting owners filing on the other forms and explains the reason for the multiple forms. The order of multiple reporting owners is not important. There is no “primary’ owner.
Date or Period - if a Form 3 – “Date of Event Requiring Statement,” if a Form 4 – “Date of Earliest Transaction,” if a Form 5 – “Statement for Issuer’s Fiscal Year Ended”
Date of Original Submission - if the form is an amendment, enter the Date of Original Submission. If the form is not an amendment, this field will be unavailable.
No longer subject to Section 16 - if the Reporting Owner is no longer subject to Section 16 reporting requirements, check the box labeled “Check this box if no longer subject to Section 16.”
Auto-Calculate – when preparing a Form 4 or 4/A for a reporting owner who has saved share information, a table will appear on the Header tab showing the current saved share amounts. This if for informational purposes only and cannot be edited from the Header tab. If the saved share information needs to be adjusted before proceeding with the form, go to Account Management/Auto-Calculate Manager and edit the record, then begin the form again. If a reporting owner has saved share information, Auto-Calculate will be ON automatically. It may be turned OFF on the Header tab by deselecting the Auto-Calculate checkbox.
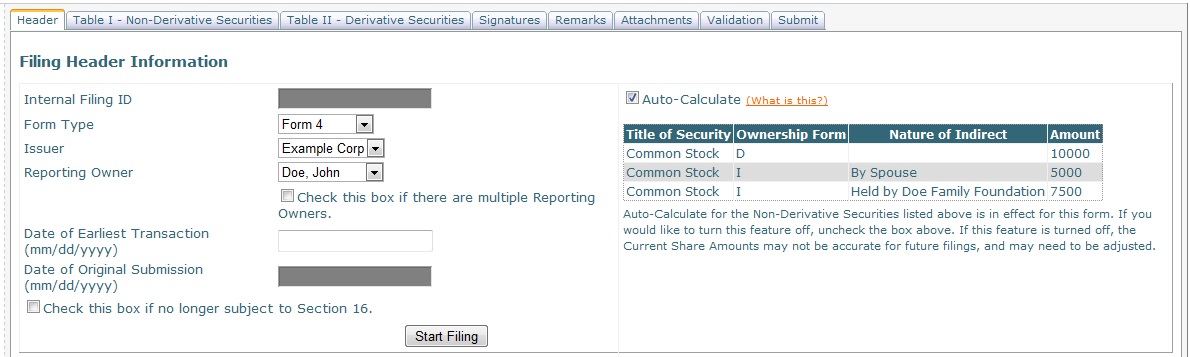
When the header information is complete, select the Start Filing button.
Table I – Non-Derivative Securities
Form 3 or 3/A
The data entry area for a Form 3 or 3/A, Table I looks like this:
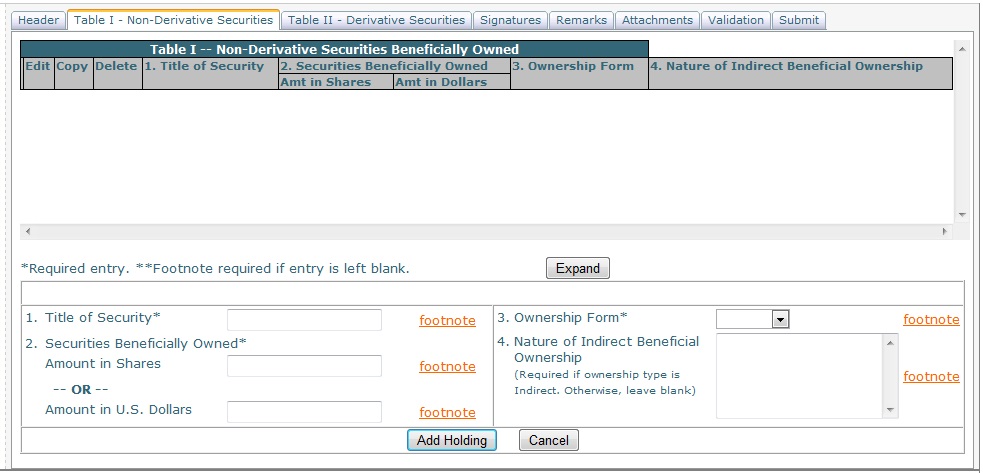
Title of Security – the title of the security.
Securities Beneficially Owned – entered either in number of shares or in amount (in US dollars).
Ownership Form – the type of ownership for the entry, either Direct or Indirect.
Nature of Indirect Beneficial Ownership – only to be used if the Ownership Form is set to Indirect.This field displays the footnotes associated with the Nature of Indirect Beneficial Ownership field.
Footnotes – to the right of fields that can be footnoted is a footnote link. Please refer to the Footnotes help section for information about footnotes.
Add Holding – when all data has been entered, select the Add Holding button to add the entry to Table I. Once added to Table I, the entry can be edited, copied, or deleted using the links to the left of the entry in Table I.
Re-ordering Entries – if there is more than one entry in Table I, you may change the order by clicking on the icon to the far left of the entry in the table and dragging the entry to its new position in the list.
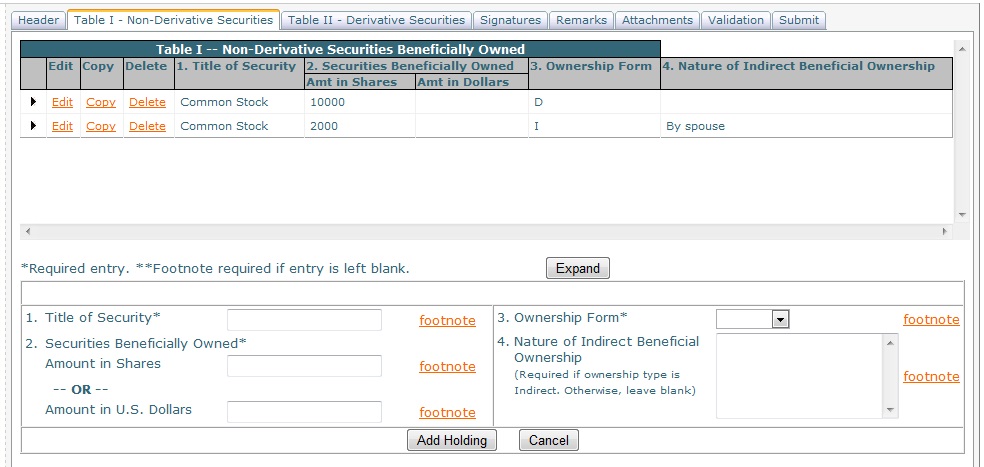
Expand/Shrink –on every Table I and Table II page there is initially an Expand button, which when selected will expand the table of entries to make them all visible. This is useful, and only works, when there are multiple entries and they do not all appear on the screen. Once the table has been expanded, the Expand button will become a Shrink button, which will return the table to its original size.
Table I – Non-Derivative Securities
Form 4 or 4/A
Table I of a Form 4 or 4/A may be completed with or without the optional Auto-Calculate feature.
Without the optional Auto-Calculate feature. (Go to instructions for completing the form with the Auto-Calculate feature.)
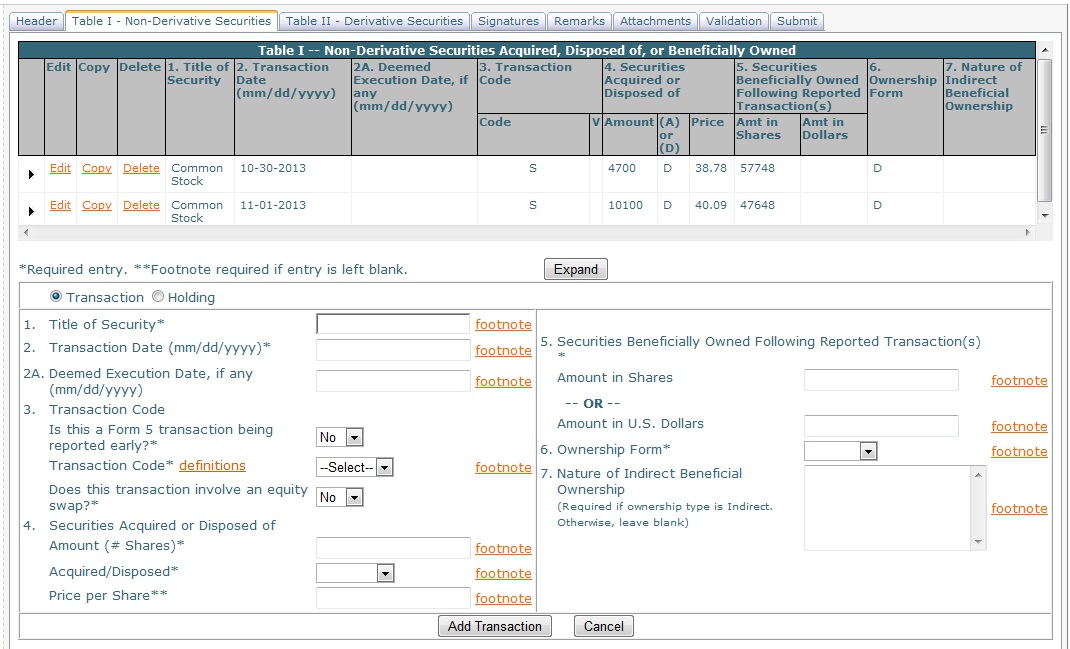
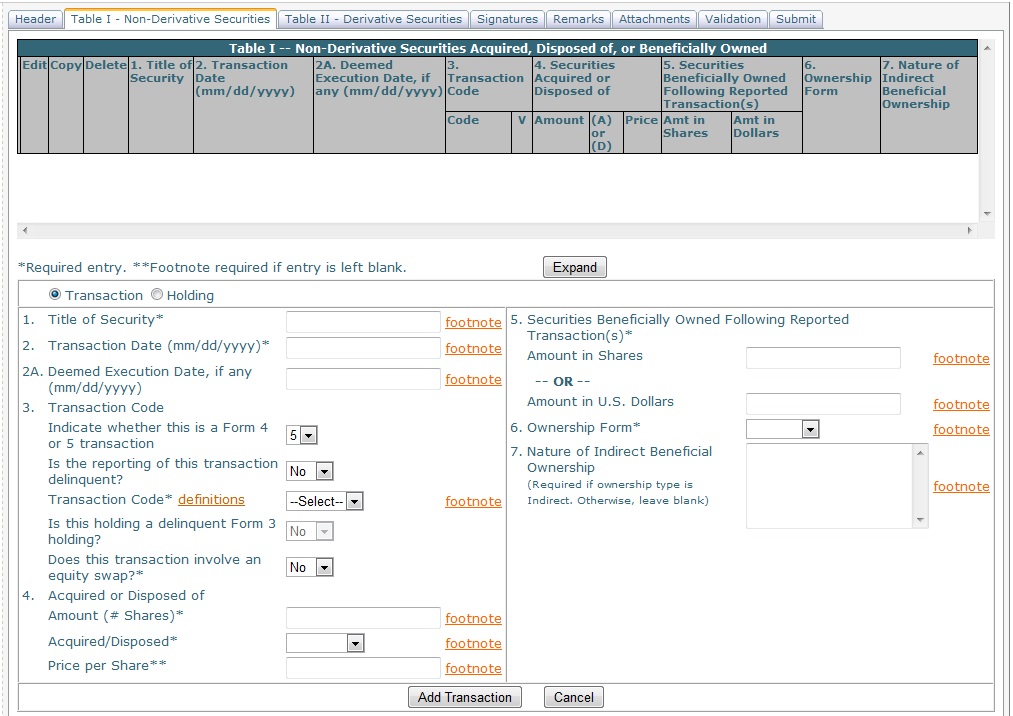
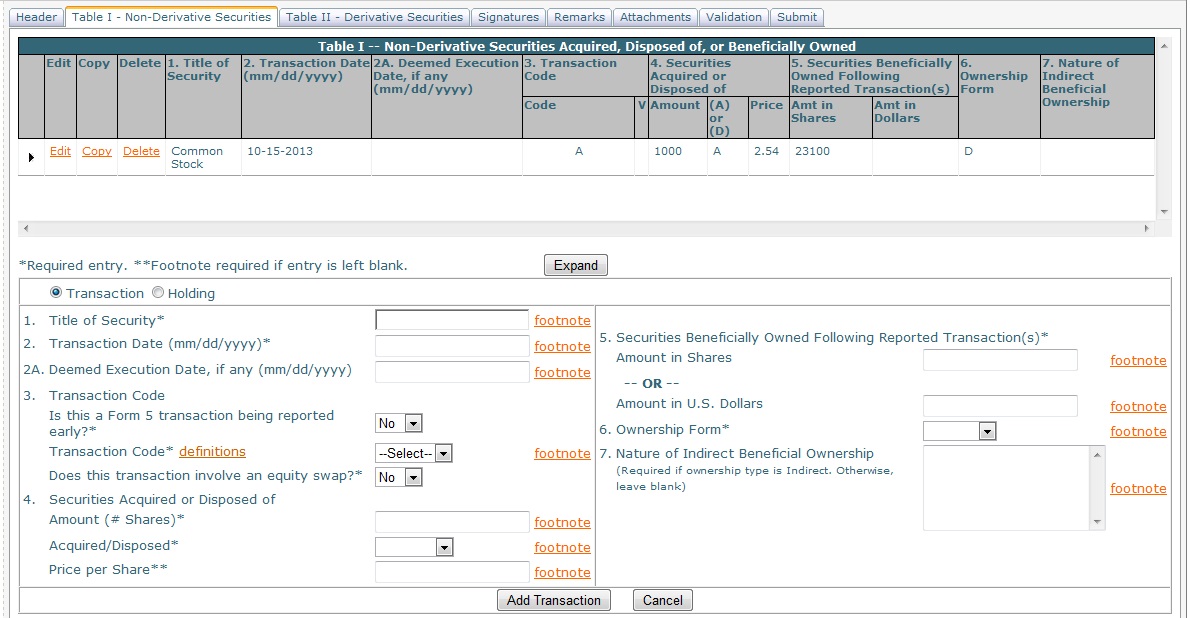
The data entry area for a Form 4 or 4/A, Table I (without Auto-Calculate) looks like this:
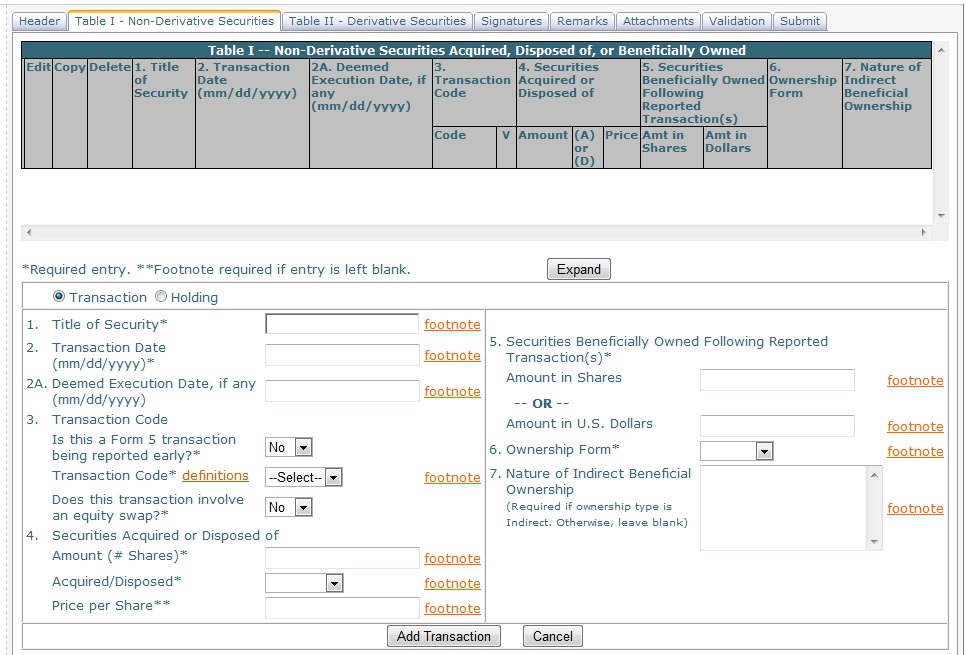
Transaction or Holding – the radio buttons at the top left specify whether the entry is a transaction or a holding. Depending on the entry type, certain fields may be unavailable in the data entry area. The default selection is Transaction.
Title of Security - the title of the security.
Transaction Date - the date of the transaction.
Deemed Execution Date, if any - the execution date for the transaction if any exists.
Transaction Code
Is this a Form 5 transaction being reported early? – select Yes if the transaction is a Form 5 transaction that is being reported early. The default is No. (Note that if Yes is selected, a “V” will appear in the entry in Table I. “V” denotes a transaction voluntarily reported earlier than required.)
Transaction Code – the drop-down list contains all the available transaction codes. Choose the desired code from the list. For more detail about each code, select the definitions link.
Does this transaction involve an equity swap? – select Yes if the transaction involves an equity swap. The default is No. (Note that if Yes is selected, a “/K” will be appended to the Transaction Code. The “K” denotes a transaction in equity swap or instrument with similar characteristics.)
Securities Acquired or Disposed of
Amount (# Shares) – the amount of securities, measured in shares, that were acquired or disposed of
Acquired/Disposed - a drop-down selection of Acquired or Disposed
Price Per Share - the price, in US dollars, of the securities acquired or disposed of
Securities Beneficially Owned Following Reported Transaction(s) - entered either in number of shares or in amount (in US dollars).
Ownership Form – the type of ownership for the entry, either Direct or Indirect.
Nature of Indirect Beneficial Ownership – only to be used if the Ownership Form is set to Indirect.
Footnotes – to the right of fields that can be footnoted is a footnote link. Please refer to the Footnotes help section for information about footnotes.
Add Transaction or Holding – when all data has been entered, select the Add Transaction or the Add Holding button, depending on which type the entry is, to add the entry to Table I. Once added to Table I, the entry can be edited, copied, or deleted using the links to the left of the entry in Table I.
Re-ordering Entries – if there is more than one entry in Table I, you may change the order by clicking on the icon to the far left of the entry in the table and dragging the entry to its new position in the list.
Expand/Shrink –on every Table I and Table II page there is initially an Expand button, which when selected will expand the table of entries to make them all visible. This is useful, and only works, when there are multiple entries and they do not all appear on the screen. Once the table has been expanded, the Expand button will become a Shrink button, which will return the table to its original size.
Table I – Non-Derivative Securities
Form 4 or 4/A
With the optional Auto-Calculate feature.
The data entry area for a Form 4 or 4/A, Table I (with Auto-Calculate) looks like this:
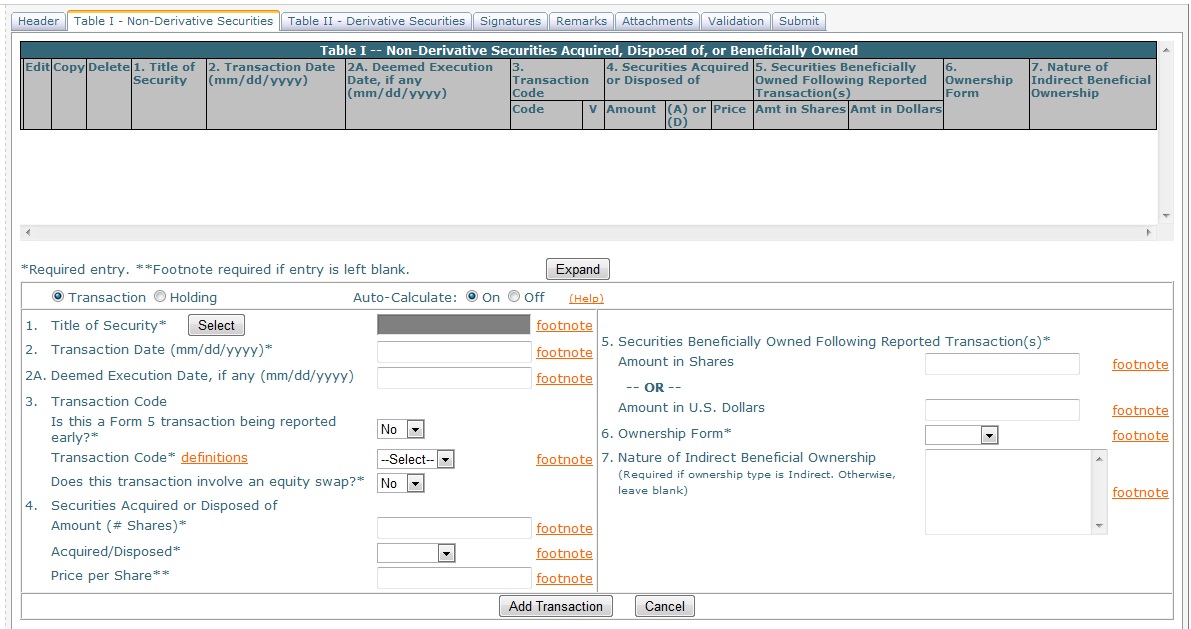
Transaction or Holding – the radio buttons at the top left specify whether the entry is a transaction or a holding. Depending on the entry type, certain fields may be unavailable in the data entry area. The default selection is Transaction.
Auto-Calculate – when Auto-Calculate is in effect, the Auto-Calculate radio buttons will be set to On. To turn Auto-Calculate off, select the Off radio button. This will turn Auto-Calculate off for the current transaction only. Once the current transaction has been completed, Auto-Calculate will be On again. To turn Auto-Calculate off completely for Table I of this Form 4 or 4/A, go back to the Header tab, uncheck the Auto-Calculate box, select the Save Filing button and continue with Table I.
Title of Security – when Auto-Calculate is on, the title of security field will be grayed out. To select a Title of Security, click the Select button. A table of saved share information will be displayed. Use the Select link to select the title of security to be used for the transaction or holding.
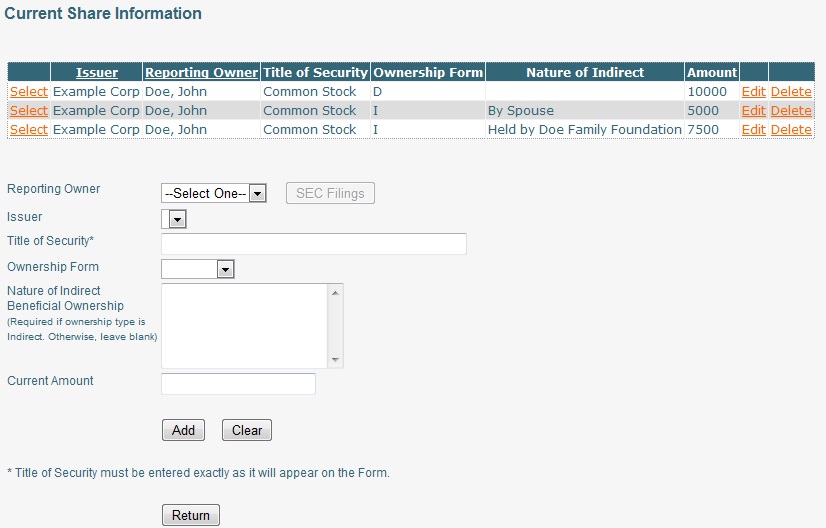
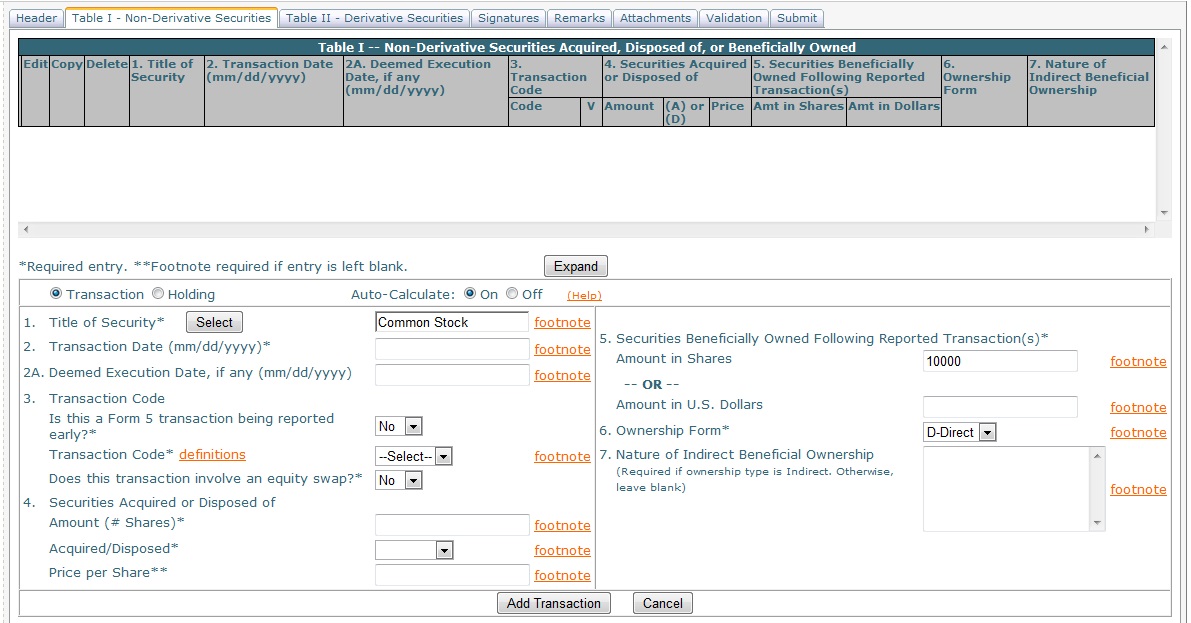
Once you have selected the title of security to be used for the transaction or holding, you will be returned to the Table I form, where Items 1, 5, and 6 will be prefilled, based on the saved share information just selected. If Item 6 is “Indirect,” Item 7 will also be prefilled.
Transaction Date - the date of the transaction.
Deemed Execution Date, if any - the execution date for the transaction if any exists.
Transaction Code
Is this a Form 5 transaction being reported early? – select Yes if the transaction is a Form 5 transaction that is being reported early. The default is No. (Note that if Yes is selected, a “V” will appear in the entry in Table I. “V” denotes a transaction voluntarily reported earlier than required.)
Transaction Code – the drop-down list contains all the available transaction codes. Choose the desired code from the list. For more detail about each code, select the definitions link.
Does this transaction involve an equity swap? – select Yes if the transaction involves an equity swap. The default is No. (Note that if Yes is selected, a “/K” will be appended to the Transaction Code. The “K” denotes a transaction in equity swap or instrument with similar characteristics.)
Securities Acquired or Disposed of
Amount (# Shares) – the amount of securities, measured in shares, that were acquired or disposed of
Acquired/Disposed - a drop-down selection of Acquired or Disposed. (Note that when you make your selection here, the Item 5 share amount will automatically update.)
Price Per Share - the price, in US dollars, of the securities acquired or disposed of
Securities Beneficially Owned Following Reported Transaction(s) - entered either in number of shares or in amount (in US dollars). If the auto-calculate feature is turned on, the number of shares amount will calculate automatically.
Ownership Form – the type of ownership for the entry, either Direct or Indirect. If auto-calculate is in use, this field will have prefilled upon the selection of a security title from the saved share information table.
Nature of Indirect Beneficial Ownership – only to be used if the Ownership Form is set to Indirect. If auto-calculate is in use, and if Ownership Form is Indirect, this field will have prefilled upon the selection of a security title from the saved share information table.
Footnotes – to the right of fields that can be footnoted is a footnote link. Please refer to the Footnotes help section for information about footnotes.
Add Transaction or Holding – when all data has been entered, select the Add Transaction or the Add Holding button, depending on which type the entry is, to add the entry to Table I. Once added to Table I, the entry can be edited, copied, or deleted using the links to the left of the entry in Table I.
Re-ordering Entries – if there is more than one entry in Table I, you may change the order by clicking on the icon to the far left of the entry in the table and dragging the entry to its new position in the list.
Expand/Shrink –on every Table I and Table II page there is initially an Expand button, which when selected will expand the table of entries to make them all visible. This is useful, and only works, when there are multiple entries and they do not all appear on the screen. Once the table has been expanded, the Expand button will become a Shrink button, which will return the table to its original size.
Table I – Non-Derivative Securities
Form 5 or 5/A
The data entry area for a Form 5 or 5/A, Table I looks like this:
Transaction or Holding – the radio buttons at the top left specify whether the entry is a transaction or a holding. Depending on the entry type, certain fields may be unavailable in the data entry area. The default selection is Transaction.
Title of Security - the title of the security.
Transaction Date - the date of the transaction.
Deemed Execution Date, if any - the execution date for the transaction if any exists.
Transaction Code
Indicate whether this is a Form 4 or 5 transaction - the form type for the transaction. Default is Form 5. (Note that if Form 4 is selected, the reporting is automatically delinquent and a “4” will be appended to the Transaction Code.)
Is the reporting of this transaction delinquent? – select Yes if the reporting of the transaction is delinquent. Default is No for a Form 5 transaction and Yes for a Form 4 transaction. (Note that if Yes, a “4” or “5” will be appended to the Transaction Code, depending on the type of transaction.)
Transaction Code – the drop-down list contains all the available transaction codes. Choose the desired code from the list. For more detail about each code, select the definitions link.
Is this holding a delinquent Form 3 holding? – applies only to Holding entries, not Transaction entries. If the entry is a Holding, and Yes is selected, a “3” will appear in the Transaction Code column. The default is No.
Does this transaction involve an equity swap? – select Yes if the transaction involves an equity swap. The default is No. (Note that if Yes is selected, a “/K” will be appended to the Transaction Code. The “K” denotes a transaction in equity swap or instrument with similar characteristics.)
Securities Acquired or Disposed of
Amount – the amount of securities, measured in shares, that were acquired or disposed of
Acquired/Disposed - a drop-down selection of Acquired or Disposed
Price Per Share - the price, in US dollars, of the securities acquired or disposed of
Securities Beneficially Owned Following Reported Transaction(s) - entered either in number of shares or in amount (in US dollars). (Note that if the auto-calculate feature is turned on, the number of shares amount will be calculated automatically.)
Ownership Form – the type of ownership for the entry, either Direct or Indirect.
Nature of Indirect Beneficial Ownership – only to be used if the Ownership Form is set to Indirect.This field displays the footnotes associated with the Nature of Indirect Beneficial Ownership field.
Footnotes – to the right of fields that can be footnoted is a footnote link. Please refer to the Footnotes help section for information about footnotes.
Add Transaction or Holding – when all data has been entered, select the Add Transaction or the Add Holding button, depending on which type the entry is, to add the entry to Table I. Once added to Table I, the entry can be edited, copied, or deleted using the links to the left of the entry in Table I.
Re-ordering Entries – if there is more than one entry in Table I, you may change the order by clicking on the icon to the far left of the entry in the table and dragging the entry to its new position in the list.
Expand/Shrink –on every Table I and Table II page there is initially an Expand button, which when selected will expand the table of entries to make them all visible. This is useful, and only works, when there are multiple entries and they do not all appear on the screen. Once the table has been expanded, the Expand button will become a Shrink button, which will return the table to its original size.
Table II –Derivative Securities
Form 3 or 3/A
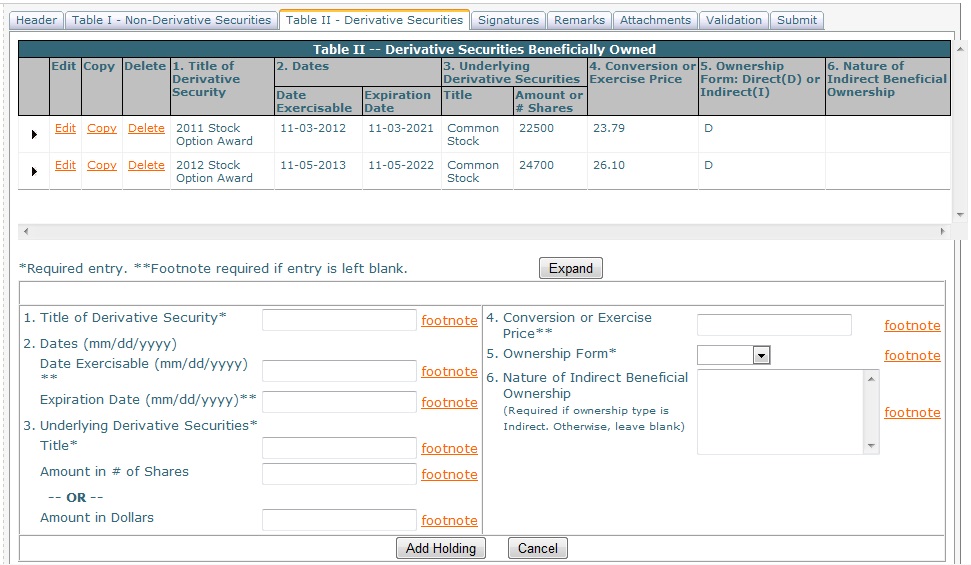
The data entry area for a Form 3 or 3/A, Table II looks like this:

Title of Security – the title of the security.
Dates
Date Exercisable - the exercisable date.
Expiration Date - the expiration date.
Underlying Derivative Securities
Title - the title of the underlying security.
Amount in # of Shares – amount, measured in shares.
Amount in Dollars - amount, measured in US dollars
Conversion or Exercise Price - the conversion or exercise price for the derivative security.
Ownership Form – the type of ownership for the entry, either Direct or Indirect.
Nature of Indirect Beneficial Ownership – only to be used if the Ownership Form is set to Indirect.
Footnotes – to the right of fields that can be footnoted is a footnote link. Please refer to the Footnotes help section for information about footnotes.
Add Holding – when all data has been entered, select the Add Holding button to add the entry to Table II. Once added to Table II, the entry can be Edited, Copied, or Deleted using the links to the left of the entry in Table II.
Re-ordering Entries – if there is more than one entry in Table II, you may change the order by clicking on the icon to the far left of the entry in the table and dragging the entry to its new position in the list.
Expand/Shrink –on every Table I and Table II page there is initially an Expand button, which when selected will expand the table of entries to make them all visible. This is useful, and only works, when there are multiple entries and they do not all appear on the screen. Once the table has been expanded, the Expand button will become a Shrink button, which will return the table to its original size.
Table II – Derivative Securities
Form 4 or 4/A
The data entry area for a Form 4 or 4/A, Table II looks like this:
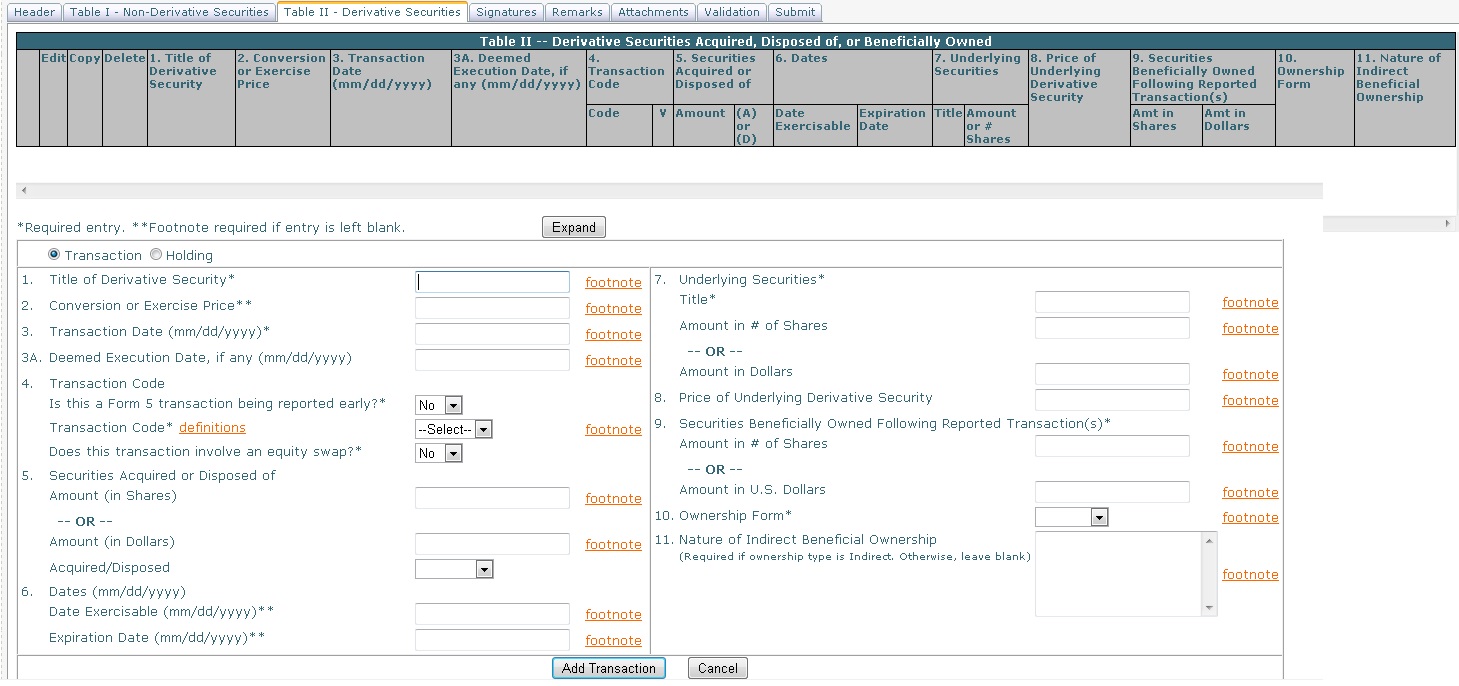
Transaction or Holding – the radio buttons at the top left specify whether the entry is a transaction or a holding. Depending on the entry type, certain fields may be unavailable in the data entry area. The default selection is Transaction.
Title of Derivative Security - the title of the security.
Conversion or Exercise Price - the conversion or exercise price for the derivative security.
Transaction Date - the date of the transaction.
Deemed Execution Date, if any - the execution date for the transaction if any exists.
Transaction Code
Is this a Form 5 transaction being reported early? – select Yes if the transaction is a Form 5 transaction that is being reported early. The default is No. (Note that if Yes is selected, a “V” will appear in the entry in Table I. “V” denotes a transaction voluntarily reported earlier than required.)
Transaction Code – the drop-down list contains all the available transaction codes. Choose the desired code from the list. For more detail about each code, select the definitions link.
Does this transaction involve an equity swap? – select Yes if the transaction involves an equity swap. The default is No. (Note that if Yes is selected, a “/K” will be appended to the Transaction Code. The “K” denotes a transaction in equity swap or instrument with similar characteristics.)
Securities Acquired or Disposed of
Amount (in Shares) – the amount of derivative securities, measured in shares, that were acquired or disposed of
Amount (in Dollars) - the amount of derivative securities, measured in US dollars, that were acquired or disposed of
Acquired/Disposed - a drop-down selection of Acquired or Disposed
Dates
Date Exercisable - the exercisable date.
Expiration Date - the expiration date.
Underlying Securities
Title - the title of the security.
Amount in # of Shares – amount, measured in shares.
Amount in Dollars - amount, measured in US dollars.
Price of Underlying Derivative Security - the price of the derivative security.
Securities Beneficially Owned Following Reported Transaction(s)
Amount in # of Shares – amount, measured in shares.
Amount in Dollars - amount, measured in US dollars.
Ownership Form – the type of ownership for the entry, either Direct or Indirect.
Nature of Indirect Beneficial Ownership – only to be used if the Ownership Form is set to Indirect.This field displays the footnotes associated with the Nature of Indirect Beneficial Ownership field.
Footnotes – to the right of fields that can be footnoted is a footnote link. Please refer to the Footnotes help section for information about footnotes.
Add Transaction or Holding – when all data has been entered, select the Add Transaction or the Add Holding button, depending on which type the entry is, to add the entry to Table II. Once added to Table II, the entry can be Edited, Copied, or Deleted using the links to the left of the entry in Table II.
Re-ordering Entries – if there is more than one entry in Table II, you may change the order by clicking on the icon to the far left of the entry in the table and dragging the entry to its new position in the list.
Expand/Shrink –on every Table I and Table II page there is initially an Expand button, which when selected will expand the table of entries to make them all visible. This is useful, and only works, when there are multiple entries and they do not all appear on the screen. Once the table has been expanded, the Expand button will become a Shrink button, which will return the table to its original size.
Table II – Derivative Securities
Form 5 or 5/A
The data entry area for a Form 5 or 5/A, Table II looks like this:
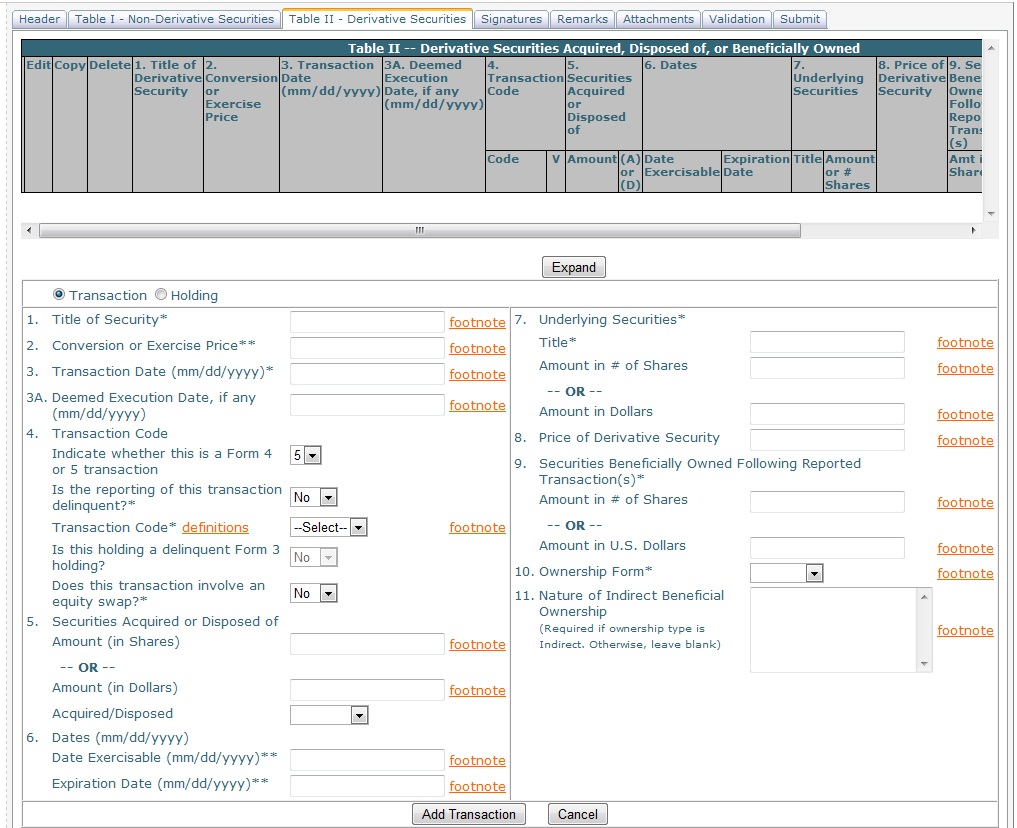
Transaction or Holding – the radio buttons at the top left specify whether the entry is a transaction or a holding. Depending on the entry type, certain fields may be unavailable in the data entry area. The default selection is Transaction.
Title of Security - the title of the security.
Conversion or Exercise Price - the conversion or exercise price for the derivative security.
Transaction Date - the date of the transaction.
Deemed Execution Date, if any - the execution date for the transaction if any exists.
Transaction Code
Indicate whether this is a Form 4 or 5 transaction - the form type for the transaction. Default is Form 5. (Note that if Form 4 is selected, the reporting is automatically delinquent and a “4” will be appended to the Transaction Code.)
Is the reporting of this transaction delinquent? – select Yes if the reporting of the transaction is delinquent. Default is No for a Form 5 transaction and Yes for a Form 4 transaction. (Note that if Yes, a “4” or “5” will be appended to the Transaction Code, depending on the type of transaction.)
Transaction Code – the drop-down list contains all the available transaction codes. Choose the desired code from the list. For more detail about each code, select the definitions link.
Is this holding a delinquent Form 3 holding? – applies only to Holding entries, not Transaction entries. If the entry is a Holding, and Yes is selected, a “3” will appear in the Transaction Code column. The default is No.
Does this transaction involve an equity swap? – select Yes if the transaction involves an equity swap. The default is No. (Note that if Yes is selected, a “/K” will be appended to the Transaction Code. The “K” denotes a transaction in equity swap or instrument with similar characteristics.)
Securities Acquired or Disposed of
Amount (in Shares) – the amount of securities, measured in shares, that were acquired or disposed of
Amount in Dollars - amount, measured in US dollars.
Acquired/Disposed - a drop-down selection of Acquired or Disposed
Dates
Date Exercisable - the exercisable date.
Expiration Date - the expiration date.
Underlying Securities
Title - the title of the security.
Amount in # of Shares – amount, measured in shares.
Amount in Dollars - amount, measured in US dollars.
Price of Derivative Security - the price of the derivative security.
Securities Beneficially Owned Following Reported Transaction(s)
Amount in # of Shares – amount, measured in shares.
Amount in Dollars - amount, measured in US dollars.
Ownership Form – the type of ownership for the entry, either Direct or Indirect.
Nature of Indirect Beneficial Ownership – only to be used if the Ownership Form is set to Indirect.This field displays the footnotes associated with the Nature of Indirect Beneficial Ownership field.
Footnotes – to the right of fields that can be footnoted is a footnote link. Please refer to the Footnotes help section for information about footnotes.
Add Transaction or Holding – when all data has been entered, select the Add Transaction or the Add Holding button, depending on which type the entry is, to add the entry to Table II. Once added to Table II, the entry can be edited, copied, or deleted using the links to the left of the entry in Table II.
Re-ordering Entries – if there is more than one entry in Table II, you may change the order by clicking on the icon to the far left of the entry in the table and dragging the entry to its new position in the list.
Expand/Shrink –on every Table I and Table II page there is initially an Expand button, which when selected will expand the table of entries to make them all visible. This is useful, and only works, when there are multiple entries and they do not all appear on the screen. Once the table has been expanded, the Expand button will become a Shrink button, which will return the table to its original size.
Footnotes can be added and referenced in Table I or Table II of a form.
To insert a footnote, select the footnote link to the right of the Table I or Table II item.
For example, to add a footnote to Item 5/Amount in Shares below, click on the footnote link to the right.
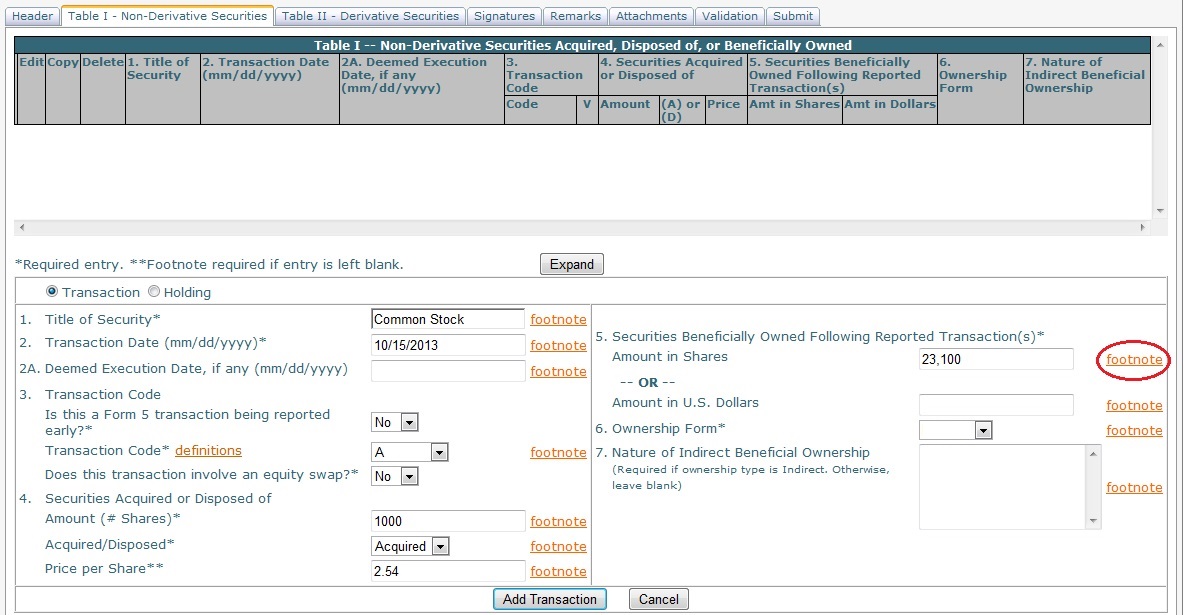
Selecting the footnote link will direct you to the footnotes page for this form.
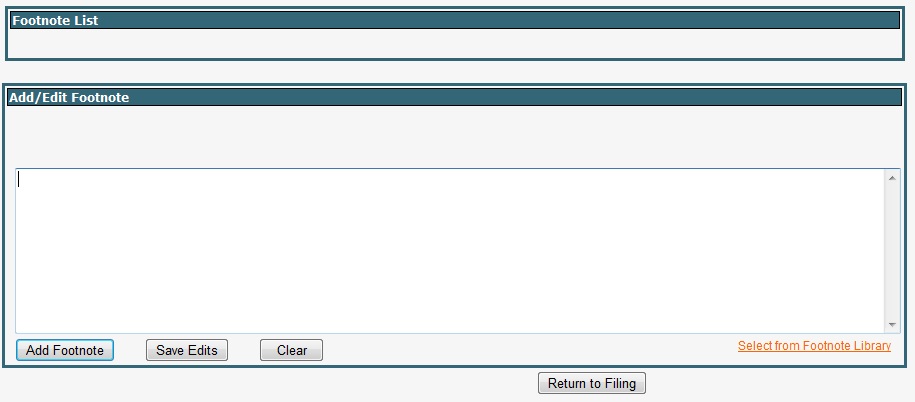
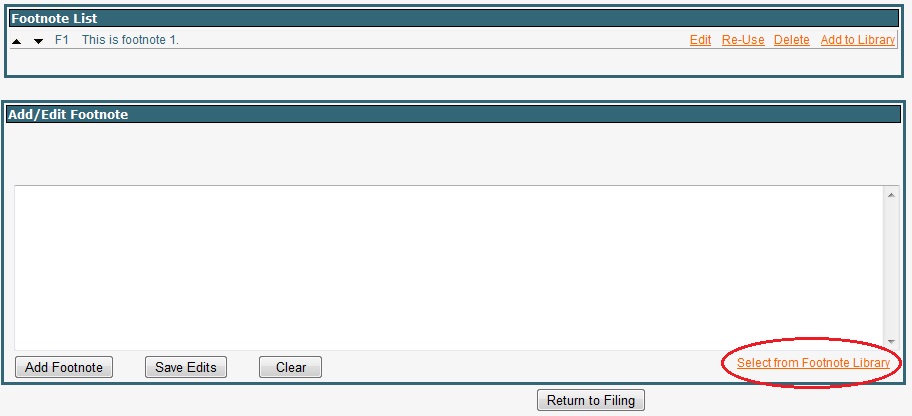
The “Footnote List” shows the footnotes that have been added to the form. In this example, this is the first footnote being added to the form.
Add New Footnote - enter the footnote text in the “Add/Edit Footnote” box…
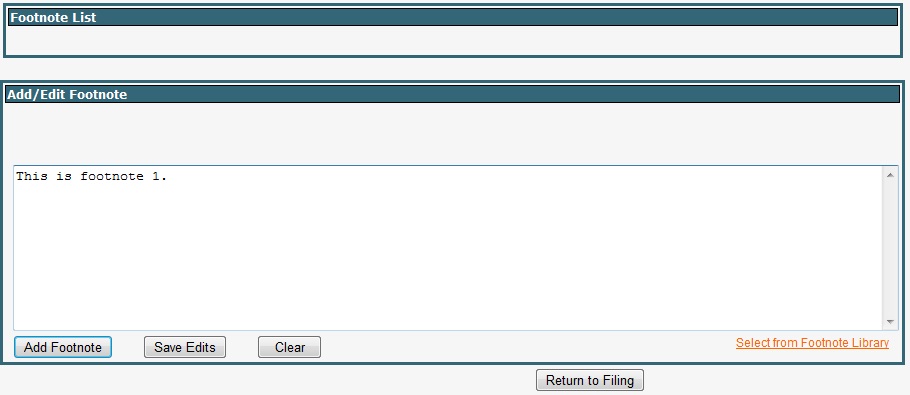
…then select the Add Footnote button. The footnote will appear in the Footnote List above.
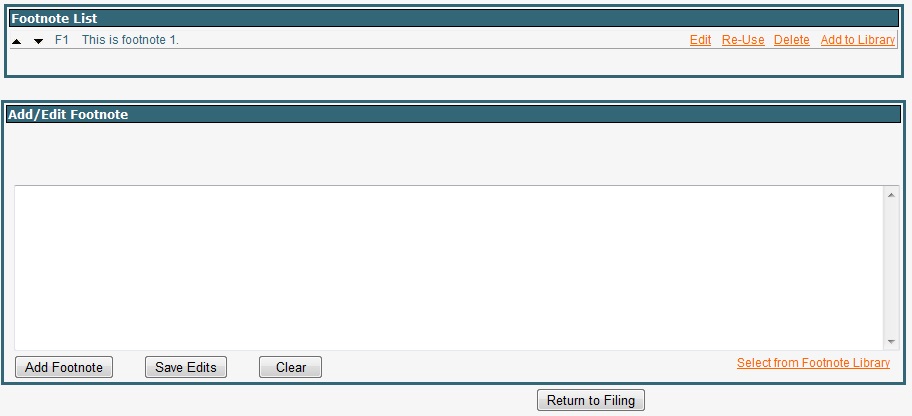
To return to the form, select the Return to Filing button. The footnote will now be referenced in the form in place of the footnote link.
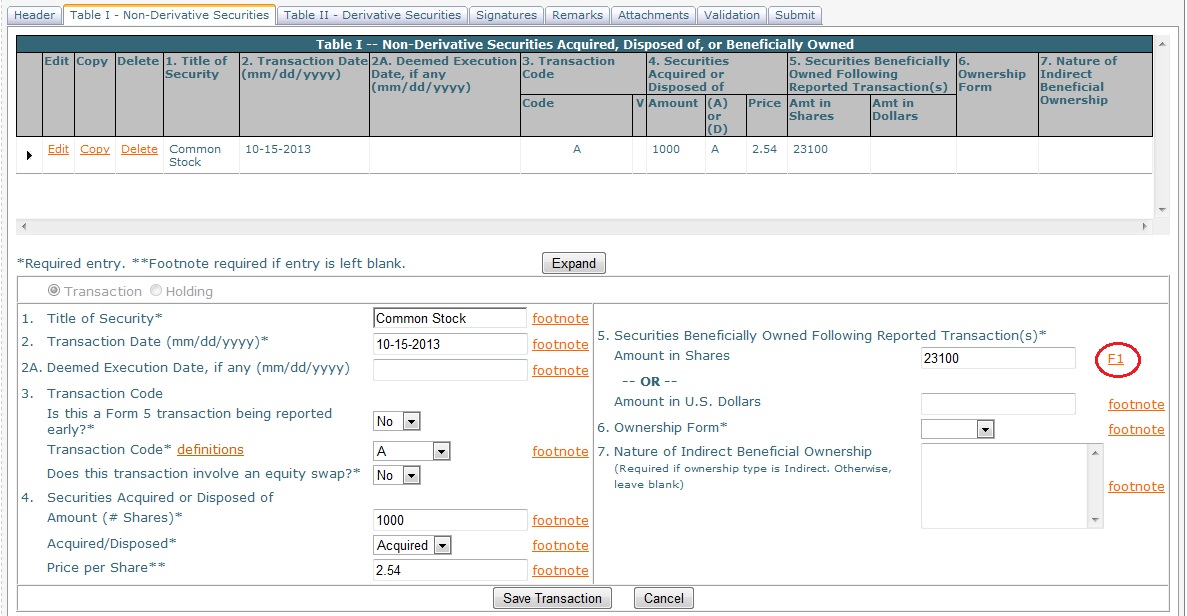
NOTE – in the image above you will notice that by returning to the form from the footnotes page, the transaction that was in progress was added to the list of entries in the table above. Because this program is web-based, navigating away from the form to the footnote page causes the transaction that was in progress to be saved. If the transaction was not complete upon navigating away, you must still save the transaction (or holding) upon completion, in order to update the saved entry. In the example above, the transaction was not yet complete – Item 6 still needed to be added. Once Item 6 is added, selecting the Save Transaction Button will update the saved entry, as seen below.
Edit Existing Footnote – to edit an existing footnote, click on the footnote number link in the form. This will direct you to the footnote page. In the “Footnote List,” click on the Edit link to the right of the footnote. The current text of the footnote will populate in the Add/Edit Footnote box. Edit the text, then click the Save Edits button. The revisions will be visible in the Footnote List above. Click the Return to Filing button to return to the form.
Re-Use Footnote – to use an existing footnote in another location, select the footnote link to the right of the Table I or Table II item. In the “Footnote List,” click on the Re-Use link to the right of the footnote you want to use again. You will be returned to the form automatically.
Delete Footnote – to delete a footnote, click on the footnote number link in the form. In the “Footnote List,” click on the “Delete” link to the right of the footnote you wish to delete. If the footnote has been used in more than one location in the form, only this use of the footnote will be deleted. Note that although the Delete link is always available in the “Footnote List,” you can only delete a footnote if you enter the footnote page through the link to that footnote on the form.
Select From Footnote Library – if you have footnotes saved to your footnote library, you may use them in the current form. Select the footnote link to the right of the Table I or Table II item. Click on the “Select from Footnote Library” link.
A list of the footnotes currently in the footnote library will appear. Click the Select link to the left of the footnote you wish to add to the form.

By clicking Select, you will return to the footnote page and the text of the selected footnote will be in the “Add/Edit Footnote” box. You may revise the text if you wish. When you are ready to add the footnote, click the Add Footnote button, the footnote will appear in the “Footnote List” above, then click the Return to Filing button.
Add to Library –you may add a footnote to your footnote library for future use by clicking the Add to Library link to the right of the footnote in the “Footnote List.”
Renumber/Reorder Footnotes – footnotes may be renumbered or reordered by using the up and down arrows to the left of the footnotes in the “Footnote List.” When you are finished, select the Return to Filing button.
Signatures Tab

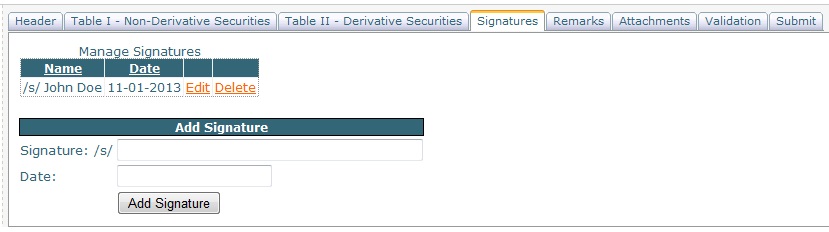
To insert a signature, type the name into the Signature field, then enter the date in the Date field and select the Add Signature button.
Once a signature has been added, you may edit or delete the signature by selecting the Edit or Delete link to the right of the entry.
The maximum characters allowed in the signature field is 255. If you need to add a title or power of attorney information, you should do so on the signature line.
Multiple signatures – you may add multiple signatures. If the form is a joint filing for multiple reporting owners, the order of the signatures does not matter. The number of signatures should be, but is not required to be, the same as the number of reporting owners filing jointly.
Remarks Tab
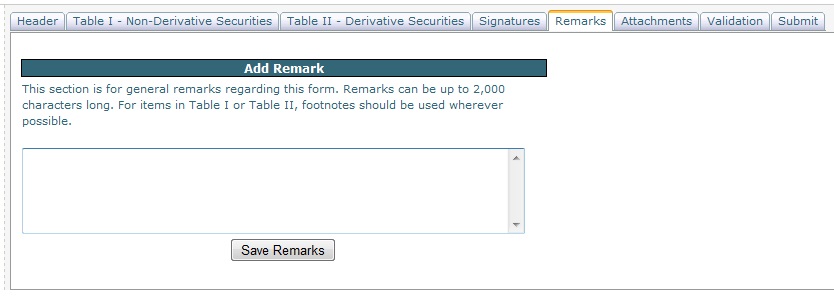
Remarks differ from footnotes in that they are not linked to any item in either Table I or Table II. The remarks field is for general remarks regarding this form. Remarks can be up to 2,000 characters long.
To add a remark, enter the text and select the Save Remarks button.
To edit a remark, edit the text in the field and select the Save Remarks button.
To remove a remark, delete the text in the field and select the Save Remarks button.
Attachments Tab
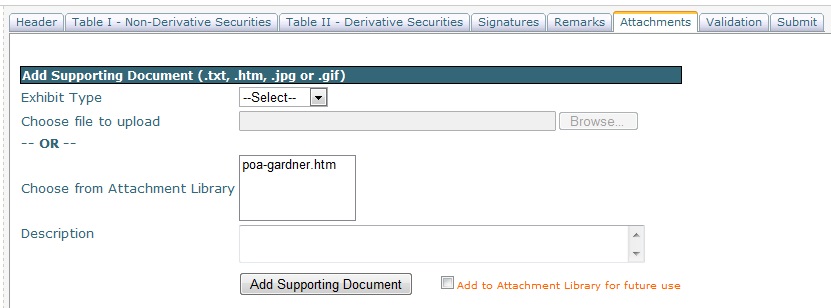
You may attach a supporting document (i.e. Exhibit) to your primary filing. The SEC allows up to 610 supporting documents per form.
Attaching an Exhibit – there are four steps: 1) select the Exhibit Type, 2) choose the file to attach (upload it from your computer or select it from your attachment library), 3) add a Description (optional), 4) select the Add Supporting Document button.
|
1. |
Exhibit Type. Exhibits must be one of these document types: |
CORRESP – correspondence to the SEC regarding the form being filed
COVER – a cover letter to the SEC regarding the form being filed
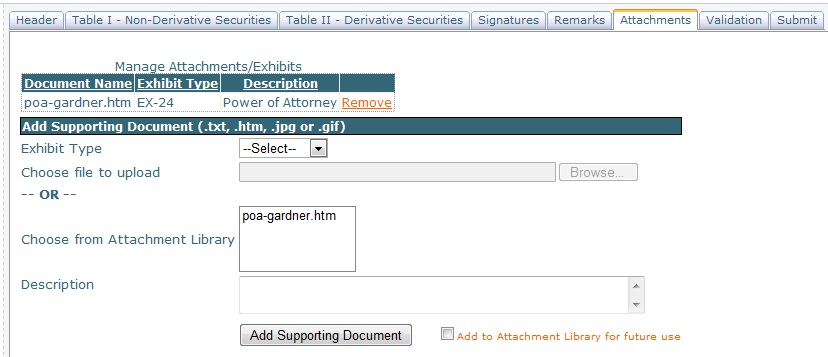
EX-24 – Power of Attorney Exhibit
EX-99 – Miscellaneous Exhibit
GRAPHIC – Image (Note that GRAPHIC cannot be filed by itself. It must be filed in combination with one of the other Exhibit Types.)
To select the exhibit type, use the drop down menu.
|
2. |
Choose file to attach. You may either browse to a file on your computer or server, or choose a saved file from your Attachment Library. (See File Types and File Naming below.) |
|
3. |
Description – an optional description of the attachment, maximum of 255 characters. |
|
4. |
Add Supporting Document – select the Add Supporting Document button to add the attachment. |
Removing an Exhibit – once an exhibit has been added, you may remove it by selecting the “Remove” link.
File Types – the SEC accepts documents with the following extensions:
- .htm – HTML document, must be SEC-compliant HTML. Saving a Word document as .htm or .html is not an SEC-compliant document.
- .txt – Text document. No line in a .txt document may exceed 80 characters in width.
- .jpg and .gif – Image files.
Note that .pdf is not an acceptable file type. If the exhibit is available only as a PDF, you may send it to RDG Filings for help in converting it to an acceptable format. Email the document(s) to rdg16support@rdgfilings.com . Be sure to include your contact information.
File Naming – file names must follow the SEC file naming convention:
- File names cannot exceed 32 characters, including the file extension.
- Valid characters are lowercase letters, digits 0-9, up to one underscore, up to one hyphen, and up to one period.
- First character of the file name must be a lowercase letter.
- Spaces are not allowed.
- File name must have a file type extension (.htm, .txt, .jpg, or .gif).
Including an Image (GRAPHIC) – an image cannot be filed by itself, it must be filed in combination with another Exhibit Type. For example, if the signature of a Power of Attorney is an image (.jpg or .gif), it must be filed as two exhibits. The first Exhibit Type would be EX-24 and the file uploaded would be an .htm document. The second Exhibit Type would be GRAPHIC and the file uploaded would be the image, either a .jpg or .gif file. This image must be referenced in the .htm document. The same holds true if the entire Power of Attorney is an image; it would still require an .htm document.
Add to Attachment Library for future use – when adding an exhibit to your form, you may also choose to simultaneously add it to your Attachment Library, so that you will have the exhibit available for future use. To do so, check the “Add to Attachment Library for future use” box to the right of the Add Supporting Document button. When you select the Add Supporting Document button, the exhibit will also be added to your Attachment Library.
Document Conversion Help - If help is needed in creating a valid document for attaching as an Exhibit, you may send your original document(s) to RDG Filings by email (rdg16support@rdgfilings.com). Be sure to include your contact information.
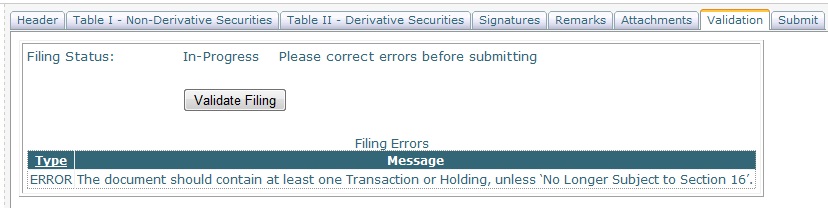
Validation Tab

On this tab you may validate the form, and send a proof by email to one or more recipients for review.
Validate Filing –validate your form to ensure that all fields comply with current SEC formats. You must validate before sending proofs or submitting to the SEC. To validate, select the Validate Filing button.
If there are errors, the errors will be listed.
Once the errors have been fixed, validate again.
If there are no errors, a “Ready to Submit” message will appear along with a link to view the form.

View Form – a validated form may be viewed in your browser and will appear similar to how it will look online when filed with the SEC. To view the form, select the View Form link. The form must be validated before the link will appear.
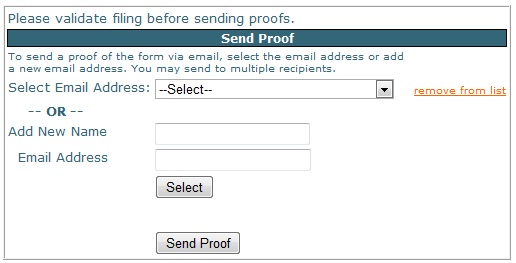
Send Proof – before filing, you may send a proof of your validated form by email to others. The email will contain a link that will open the form in their browser. To send a proof via email to one or more recipients, you must first select or add an email address:
|
1. |
Select Email Address – use the drop down menu to select an email address that has been used before. Once you have selected the email address, click the Select button below. The person’s name and email address will be added to a table of individuals to whom the proof will be sent. (Note that non-current email addresses that appear in the drop down menu may be removed by selecting the email address, then clicking the remove from list link to the right.) |
|
2. |
Add New Name/Email Address – type in the name and email address of the person you’d like to send a proof to, then click the Select button below. The person’s name and email address will be added to a table of individuals to whom the proof will be sent. The name and email address will be added to the drop down menu from which it can be selected for future filings. |
Once you have selected all of the people to whom the proof will be sent, click the Send Proof button.
Submit Tab
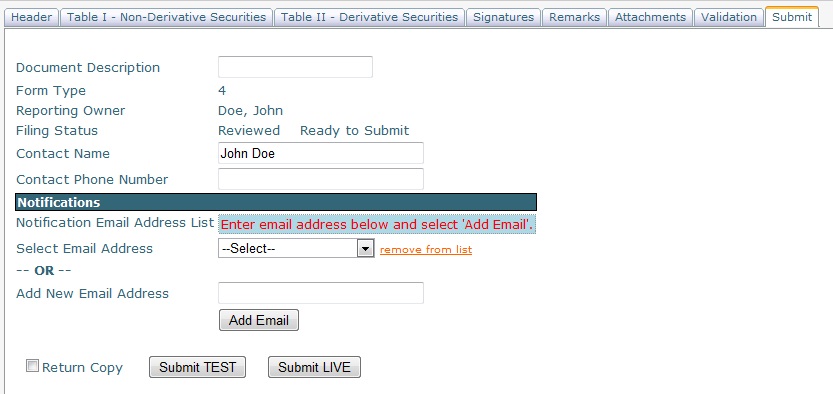
When you are ready to submit your form to the SEC as either a TEST or LIVE filing to the SEC, complete the form above and select either the Submit TEST or Submit LIVE button.
Document Description –this is optional and we recommend that it be left blank. When the form is filed with and accepted by the SEC, it will be displayed on the SEC’s website. The Document Description will by default be the name of the form type filed, for instance, if a Form 4, the Document Description will be “FORM 4”. If you’d rather have a different description, you may add it in this field. The character limit is 255.
Contact Name – (optional) – it will automatically fill with the user name associated with the login in use. Contact information is for the SEC in case they have a question about the filing. If contact name and phone number are left blank, the SEC will go to the contact information in the reporting owner’s record in their database.
Contact Phone Number – (optional, may be left blank)
Notifications –you may add up to 30 email addresses to which SEC Acceptance/Suspension email notifications will be sent when the form is filed. There are two methods for adding a notification email address to the filing:
|
1. |
Select Email Address – use the drop down menu to select an email address that has been used before. Once you have selected the email address, click the Add Email button below. The email address will be added to the Notification Email Address List table. (Note that non-current email addresses that appear in the drop down menu may be removed by selecting the email address, then clicking the remove from list link to the right.) |
|
2. |
Add New Email Address – type in an email address, then click the Add Email button below. The email address will be added to the Notification Email Address List table. The email address will also be added to the drop down menu from which it can be selected for future filings. |
Return Copy – if checked, requests a Return Copy of the filing as the SEC receives it. Copies of accepted filings are stored on the SEC’s EDGAR Filing Website for seven business days and available to download. Getting into the SEC’s EDGAR Filing Website requires the reporting owner’s CIK and Password. It is recommended that Return Copy be left unchecked.
Submit TEST – select this button if you’d like to submit a test filing to the SEC. Note that the button will be inactive until the filing has been validated on the Validation tab. Once the Submit TEST button has been selected, the filing process will begin and continue through these three stages:
|
1. |
Message: “Please wait while we process the file…” |
|
2. |
Message: “Process was successful, waiting for SEC response.” |
|
3. |
Message: “SEC has returned a response, and you will be redirected to the Account Home page in 5 seconds.” |
|
4. |
You will be redirected to Account Home page. Since this is a TEST filing, the filing will still be in the Saved Drafts list. The TEST Filing Status will appear now as either TEST-ACCEPTED or TEST-SUSPENDED. |
Note that at any time after submitting the TEST filing, you may navigate away from the Submit tab. It is not necessary that you remain on the Submit tab waiting to discover the status of the filing. If you do navigate away, you can see the status of your filing on the Account Home page, in the list of Saved Drafts. If the status is “Test-Submitted” you may select the (refresh) link until the status updates to either TEST-ACCEPTED or TEST-SUSPENDED.
Submit LIVE - select this button when you are ready to submit a live filing to the SEC. Note that the button will be inactive until the filing has been validated on the Validation tab. Once the Submit LIVE button has been selected, the filing process will begin and continue through these three stages:
|
1. |
Message: “Please wait while we process the file…” |
|
2. |
Message: “Process was successful, waiting for SEC response.” |
|
3. |
Message: “SEC has returned a response, and you will be redirected to the Account Home page in 5 seconds.” |
|
4. |
You will be redirected to Account Home page. Since this is a LIVE filing, the filing will still be in the LIVE Filings list. The Filing Status will appear now as either Suspended or Accepted. |
Note that at any time after submitting the LIVE filing, you may navigate away from the Submit tab. It is not necessary that you remain on the Submit tab waiting to discover the status of the filing. If you do navigate away, you can see the status of your filing on the Account Home page, in the list of LIVE Filings. If the status is “Submitted” you may select the (refresh) link until the status updates to either Accepted or Suspended.
SUSPENDED TEST Filing – if a TEST Filing is suspended, you should receive a copy of the SEC’s Suspension email which will list the errors at the bottom of the email. You may also go to the Account Home page/Saved Drafts, and click on the Suspended link in the TEST Filing Status column. The same SEC email will be displayed. To correct the errors and resubmit, select the form from the Saved Drafts list by clicking the Select link.
SUSPENDED LIVE Filing – if a LIVE Filing is suspended, you should receive a copy of the SEC’s Suspension email which will list the errors at the bottom of the email. To correct the errors and resubmit, select the form from the LIVE Filings list by clicking the Select link.
Account Home
Select Account Home from the navigation menu at the top of the RDG16 page.
The Account Home page shows all prepared forms, divided into two states: Saved Drafts and LIVE Filings.
Saved Drafts – the Saved Drafts list shows all forms that have not yet been submitted as a LIVE filing. These forms can be in various states: started but not yet finished, finished but not yet validated, finished and validated (ready to file), or TEST filed. To open a form from Saved Drafts, click the Select link. To view a form from Saved Drafts, click the View link (only available if the form has been validated successfully). To delete a form from Saved Drafts, click the delete link.
LIVE Filings – the LIVE Filings list shows all forms that have been submitted as a LIVE filing. This includes even those forms that have been submitted LIVE but Suspended by the SEC. To open a suspended form, click the Select link. (Accepted forms can be viewed but not opened.) To view a form, click the View link. To delete, click the Delete link.
Sort list – you may sort the forms in either list by clicking on column headers that are underlined.
Filing History
Select Filing History from the navigation menu at the top of the RDG16 page.
You may search filing history by Form Type, Issuer, Reporting Owner and dates. The search includes only forms created on RDG16 under this account. The search includes all forms, regardless of whether they have been submitted or accepted.

Once you have done your search and have your list of search results, you may View, Copy or Amend the form by selecting the appropriate link.
Copy will create a new filing using a copy of the selected filing. You will have the option of selecting a new reporting owner.
Amend will create a new amendment filing using a copy of the selected filing. Note that you will only be able to amend a filing that has been submitted and accepted.
Frequently Asked Questions
|
Q: |
The proof of my form does not match the format of the SEC's form exactly. |
|
A: |
When your form is transmitted to the SEC, only the form data is transmitted. At the SEC, the data is then placed into the SEC's online form. So once filed, your form will match the SEC's form exactly. |
|
Q. |
Which forms does the auto-calculate feature work on? |
|
A. |
Currently, the auto-calculate feature is enabled only for Table I of a Form 4. We are working to expand the auto-calculate feature. If Form 4, Table II transactions or Form 5 transactions done without the auto-calculate feature cause the post-transaction total amounts to lag in RDG16, the post-transaction amounts can be updated in the Auto-Calculation Manager before the next Form 4 is prepared. |
|
Q. |
Every time I start a Form 4 for a reporting owner, the auto-calculate feature is turned on. How do I turn it off? |
|
A. |
The reason the auto-calculate feature is turned on is because there is saved share information for the reporting owner in the Auto-Calculate Manager in Account Management. If you do not want to use the auto-calculate feature for any Form 4s created for this reporting owner, then you will need to delete this reporting owner’s records in the Auto-Calculate Manager in Account Management. Once you do so, subsequent Form 4s will not have auto-calculate enabled. If you only want to turn auto-calculate off for the current Form 4 but not for subsequent Form 4s, you can uncheck the auto-calculate box on the Header tab. Note that every time you exit the form and then re-enter it, you’ll have to repeat this step. |
|
Q. |
The proof of my form does not show all of the attachments. |
|
A. |
The proof will only show the first page of your attachment. Most Power of Attorneys are only one page in length. |
|
Q. |
I cannot View a form. When I try, I get a message that there has been an error trying to process my request. |
|
A. |
Forms can be viewed only after they have been successfully validated. To validate the form, select the form, go to the Validation tab, and click the Validate button. At the Account Home page, the Status of a validated form will be "Reviewed". |
|
Q: |
In Account Management/Issuer Information, I added another issuer but I don’t see this new issuer in the drop-down menu for the Footnote Library, the Attachment Library or the Auto-Calculate Manager. |
|
A: |
You must leave the Account Management section and then return to it in order to refresh the database to show the new issuer that was added. Click on the Account Home link, then click again on Account Management. The new issuer will be available now. |